


You invested serious money in your logo. You hired a designer, debated font choices for hours, agonized over the exact shade of blue, and protected it with trademarks. Now you want that logo on employee uniforms, trade show giveaways, and client gifts. You send your pristine vector file to an embroidery shop, and days later they send back a photo of a stitched sample. Something looks wrong. The text is blurry. The fine lines disappeared. The colors look flat. This is not your logo. This is a compromise you never agreed to.
Here is the truth: your beautiful print logo will not stitch well without intentional transformation. The sooner you accept this, the sooner you get embroidery you actually love. Learning to Convert Your Business Logo to Embroidery through a deliberate, informed process protects your brand identity and eliminates costly, embarrassing mistakes. This guide walks you through every step, from logo assessment to final stitch-out, ensuring your embroidered logo represents your business as powerfully as your printed one.
Step 1: Assess Your Logo Honestly
Before any software opens or any digitizer receives files, you must look at your logo with fresh, critical eyes. Embroidery imposes hard limitations. Identifying potential problems now prevents disappointment later.
Evaluate text size. Measure the smallest letters in your logo at the size you intend to stitch. Anything smaller than 0.25 inches (6-7mm) in height risks illegibility. Script fonts, thin serifs, and tight letter spacing compound this problem. Your digitizer can suggest modifications, but you must approve them.
Examine fine details. Hairline rules, delicate flourishes, and intricate interior shapes that print crisply at business card size vanish when translated to thread. You cannot stitch what you cannot see from three feet away.
Count your colors. Every thread color requires a machine stop and manual or automatic change. Production shops charge per color change. More colors mean higher costs and slower turnaround. Professional embroidery rarely exceeds eight to ten colors. Most successful logos use three to five.
Consider gradients and shadows. Embroidery machines lay solid thread colors. They cannot blend two colors gradually within a single stitch column. Gradients, drop shadows, and glows must convert to solid color zones or disappear entirely.
Identify critical brand elements. Which parts of your logo are non-negotiable? The icon shape? The specific font? A signature color? Communicate these priorities clearly to your digitizer. They cannot read your mind.
Step 2: Source or Create the Highest Quality Artwork
Your digitizer's results depend entirely on your starting artwork. Garbage in, garbage out applies nowhere more brutally than embroidery digitizing.
Provide vector files whenever possible. AI, EPS, PDF, or SVG files contain mathematical paths, not pixels. Your digitizer imports clean, scalable outlines ready for stitch assignment. This is the single biggest favor you can do for your embroidery quality.
If you only have raster files, maximize resolution. JPEG and PNG files should be at least 300 DPI at your target stitch size. A tiny logo pulled from your website will not magically improve through digitizing. It will stitch exactly as blurry as it appears on screen.
Avoid low-resolution source files at all costs. Do not screenshot your logo from social media. Do not right-click-save from a PDF viewer. Do not send a business card scan and ask your digitizer to "clean it up." They can, but you will pay for the reconstruction time, and results will never match proper vector artwork.
Consider professional redrawing. If your only logo version is a low-resolution raster file, invest in vector tracing services before digitizing. A clean vector foundation benefits every future use of your logo, not just embroidery.
Step 3: Choose Your Digitizing Path
You have two distinct routes to an embroidered logo. Each serves different needs, budgets, and quality expectations.
Path A: Professional Digitizing Service
You send your artwork to a professional digitizer. They return a stitch-ready embroidery file optimized for your specific garments and machines.
This path delivers guaranteed quality. Professional digitizers understand pull compensation, underlay requirements, stitch density balancing, and pathing efficiency. They have digitized thousands of logos across every fabric type. They test-stitch their work and correct errors before you ever see the file.
Cost ranges from $15 to $50 per design depending on complexity, stitch count, and turnaround speed. Most reputable services offer revisions and satisfaction guarantees.
Path B: DIY Digitizing Software
You purchase embroidery digitizing software and create the file yourself.
This path offers unlimited creative control and eliminates per-design fees. Software options range from $85 (SewArt) to $950 (Hatch Embroidery) to enterprise-level investments (Wilcom, Pulse). The learning curve is steep. Expect weeks or months of practice before producing commercial-quality results.
Our recommendation: For your primary business logo, the asset that appears on every uniform and every client gift, hire a professional. One perfect digitizing job serves you indefinitely. The cost is negligible compared to the embarrassment of poorly stitched logos.
Step 4: Communicate Critical Information to Your Digitizer
Professional digitizers are skilled, but they are not psychic. Your specific project details directly influence how they construct your file.
Specify the garment type. A logo destined for stiff polo shirts requires different digitizing than the same logo destined for stretchy performance fabrics or structured caps. Polo fabric needs moderate pull compensation. Performance knits need aggressive compensation and lighter density. Caps need specialized cap digitizing with corrected proportions for curved surfaces.
Confirm the stitch size. Provide your exact target dimensions. If you are unsure, request common sizes: medium chest logos typically run 3.5 to 4 inches wide. Cap logos run 2 to 2.5 inches wide. Left chest logos run 3 to 3.5 inches wide.
Identify color priorities. If your brand blue must match a specific Pantone, provide that number. Your digitizer cannot guarantee an exact thread match across different brands and dye lots, but they can select the closest available thread color and provide substitution recommendations.
Mention any production deadlines. Need the file tomorrow? Most digitizers offer rush services for an additional fee. Communicate this upfront, not after they quote standard turnaround.
Step 5: Understand the Digitizing Process (So You Can Evaluate Results)
You do not need to digitize your own logo to evaluate whether a digitizer did good work. These four technical elements separate professional files from amateur attempts.
Underlay: Foundation stitches that stabilize fabric and prevent top stitches from sinking. Proper underlay is invisible in the final design but essential for clean edges and durable results. Missing or insufficient underlay causes puckering and registration loss.
Pull compensation: Thread tension physically pulls fabric. Without compensation, a perfectly drawn circle stitches as an oval. Your digitizer deliberately oversizes shapes in specific directions so they pull back to correct dimensions. Inadequate compensation shows as distorted shapes.
Stitch density: Stitches per inch. Too dense creates stiff, board-like embroidery that damages fabric and breaks thread. Too sparse leaves fabric visible between stitches. Professional density balances coverage with flexibility.
Pathing: The order your machine sews design elements. Efficient pathing minimizes thread trims, reduces jumps, and groups colors logically. Poor pathing doubles production time and increases thread waste.
A professional digitizer makes all these decisions invisibly. Your only evidence is a clean, flat, correctly shaped final stitch-out.
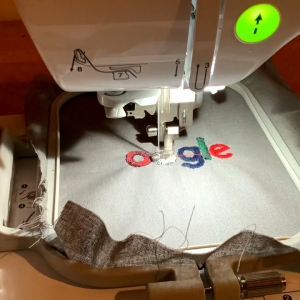
Step 6: Request a Test Stitch-Out
Never, ever run a newly digitized logo directly onto your final garments. This is the most expensive mistake businesses make.
Request a physical sample. Reputable digitizers include a test stitch-out photo with every order or offer physical sample mailing for an additional shipping fee. If they do not offer this, ask.
Evaluate the sample critically. Stitch it on fabric similar to your production garments. Examine it under good lighting. Check all text for legibility. Verify circle and square shapes are not distorted. Look for gaps between color layers. Assess the back for excessive thread buildup or tension issues.
Identify necessary revisions. No professional is offended by revision requests. You are paying for a perfect result. If the text is too small, the colors feel flat, or the overall size is wrong, communicate clearly and specifically.
Approve the final sample. Once you approve a test stitch-out, that file becomes your master. Any future embroidery using that approved file should match exactly.
Step 7: Build Your Embroidery Asset Library
Your approved embroidery file is now an official brand asset deserving the same care as your logo files and brand guidelines.
Save multiple formats. Your digitizer likely delivered EXP, DST, or PES. Also request the native file format (.EMB, .VIP, .ART) so future edits are possible. Save a high-resolution PNG or JPG of your test stitch-out for visual reference.
Name files consistently. Include brand name, size, and key specifications: "CompanyName_4inChest_3color.PES." This prevents confusion when you have multiple logo variations.
Document thread colors. Record the specific thread brand and color numbers used in your approved sample. Madeira, Isacord, Robison-Anton, and Marathon all use different numbering systems. If you switch thread brands or production shops, you need this information to maintain color consistency.
Share with your production partners. If you work with multiple decorators, provide them with your approved embroidery file directly. Do not make them re-digitize from your print logo. Every re-digitizing introduces interpretation variation. Your master file ensures consistency across all your branded merchandise.
Step 8: Plan for Multiple Sizes and Placements
Your logo does not live at one size forever. You will need small versions for left chest embroidery, medium versions for back of shirts, and specialized versions for caps and sleeves.
One size does not fit all. Simply scaling an embroidery file up or down destroys stitch density. A file digitized for 4 inches wide becomes a thread board if scaled to 5 inches. A file digitized for 4 inches wide loses coverage and shows fabric if scaled to 2 inches.
Create a size family. Professional brands commission multiple digitized versions of their logo at common sizes. Each version is independently digitized with appropriate density and compensation for its target dimensions.
Cap digitizing is different. Cap logos require special handling because the embroidery field curves. Your digitizer should create a dedicated cap version with adjusted proportions that appear correct on a curved surface.
Consider simplified versions. For very small embroidery (1.5 inches or less), consider creating a simplified logo version. Remove text. Simplify icons. Reduce detail. A clean, readable small logo beats an illegible full logo every time.
Step 9: Maintain Quality Across Production Runs
Your perfect embroidery file is not a set-it-and-forget-it asset. Production conditions change, and your results can drift.
Audit random samples. Pull occasional finished garments from your production runs. Compare them to your approved master sample. If quality drops, investigate immediately. The problem may be your file, your production partner's machine maintenance, their thread quality, or their stabilizer selection.
Re-approve files when changing decorators. If you switch embroidery vendors, provide your master file and require a test stitch-out before full production. Different machines, different tensions, and different software versions all introduce variables. Do not assume your file works identically everywhere.
Refresh files periodically. Embroidery file formats evolve. Software updates sometimes alter how legacy files interpret. If you use a file that has not been opened in five years, request a fresh export from your digitizer.
Conclusion: Your Logo Deserves Better Than "Good Enough"
Converting your business logo to embroidery is not a technical afterthought. It is brand stewardship. Every embroidered logo that walks out your door on a uniform, a hat, or a bag carries your reputation with it. A blurry, puckered, poorly stitched logo tells customers you accept mediocrity. A clean, crisp, perfectly executed logo tells customers you demand excellence.
The steps are clear. Assess your logo honestly. Provide the highest quality artwork. Hire professionals who understand the difference between printing and stitching. Communicate your requirements clearly. Test before you commit. Build your embroidery asset library. Plan for multiple applications. Maintain vigilance across production runs.
When you convert your business logo to embroidery the right way, you stop hoping for acceptable results and start expecting perfect ones. Your logo worked hard to earn its recognition. It deserves to be stitched with the same care and intention that created it. Now you know exactly how to make that happen.